By Jazmin Decker
Say goodbye to summer and spring into fall with some super easy DIY Décor ideas for the interior and exterior areas of your home! Add a few unique Autumn touches this fall with a couple of these cheap and simple DIY designs.
Fall Succulent Planters:
“For a super simple, easy fall decor, grab a pumpkin container and make some adorable fall succulent planters!”
Here are a few of the supplies you will need:
· a pumpkin shaped container and/or a Styrofoam core pumpkin
· a large knife to cut through the pumpkins
· potting soil
· varied small succulents
First, draw a circle the size of your desired opening and use a large knife to cut a circle at an inward angle. Take out the cut-out section and dig out any extra bits of Styrofoam with your hands to make a bowl-shaped hole. Line the hole with plastic before you pour your soil in. Pour the desired amount of soil into the pot and choose which succulents you would like to plant in each container. Try pairing different styles and shapes of plants together to create diversity between the pumpkin containers. Once you have planted everything, trim the excess plastic from the edge of your plantings and enjoy your beautiful creations!
Bourbon Bottle Pumpkins & Gourds:
Here are a few of the supplies you will need:
· white spray paint primer
· colored acrylic paints of your choice
· cheap craft paint brushes of various sizes
· your gourd and pumpkin shaped bottles
· any decorations you would like to put on your bottle (leaves, string, etc.)
To start off, it is smart to first spray the bottles with white primer once the labels are removed to make it easier to paint the bottles later. Once the primer is dry, it is time to paint the bottles with the various oranges and yellows that you chose. If you’re attempting to make the bottles look more realistic with the color choices, then try to mix the different colors together and create variations of color
throughout the bottles. From the middle of the neck of the bottle all the way to the top, take a dark green or a dark brown and paint it one solid color so that none of the orange color is showing through. To finish up the bottle gourds, wind jute twine around the dark green neck, using a hot glue gun to hold it in place so that it doesn’t move around. While wrapping the twine, try gluing in a few vine-like leaves (ones that can be found at Michaels) in order to make the bottles look like real pumpkins and gourds. Once you finish wrapping the twine, then you’re done! Your pumpkin is finished and you can use them to decorate around your home for any of your Autumn DIY needs.
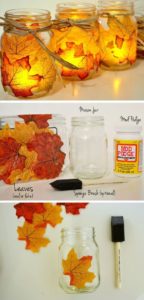 Fall Leaf Mason Jar Candle Holder:
Here are a few of the supplies you will need:
• a mason jar
• leaves (can be real or fake)
• a sponge brush
• a jar of mod podge
Start off this craft by taking your clean mason jar and applying the mod podge to the outside of the jar, making sure to cover every inch of the jar with a decent amount of mod podge. Right after applying the mod podge, take the leaves of your choice and start pushing them onto the outside of the jar making sure they stick to the adhesive. After the entire jar is covered with your desired amount of leaves, take more of the mod podge and apply it to the top of the leaves, causing the leaves to have a top coat of adhesive so that they don’t end up falling off. Once the jar is dry, take any other desired decorations and apply them to the outside of the jar. Once you are finished decorating the outside of the jar, grab the candle and stick it inside the jar. Light up the candle and you now have a beautifully unique candle holder for the upcoming Autumn days!
http://www.clipzine.me/u/clip/77723831978915537008
Leaf Bowl:
Here are a few of the supplies you will need:
• a plastic bowl
• artificial leaves
• a sponge brush
• a jar of mod podge
· plastic wrap
This craft is very unique, creative, and very easy to recreate! The first step to this craft is to cover the bowl you would like to use in plastic wrap. After the bowl is wrapped, paint Mod Podge onto a leaf, and press the leaf onto the bowl. Repeat with various leaves, overlapping the leaves as you go. Continue doing this process until the base is covered and half the sides of the bowl are covered with leaves. To hold the leaves in place while the Mod Podge set, cover the wet leaves with more plastic wrap. Press on the plastic wrap to smooth out the leaves and help them stick together. After that, place the covered leaves in the sun for about 4 hours, then carefully removed the outer layer of plastic wrap and let the leaves dry completely. When the mod podge is dry, carefully take the leaves and plastic wrap off the bowl. Carefully peel back the plastic wrap from the inside of the leaf bowl. This gorgeous DIY design makes the perfect addition to a side table or coffee table this fall season.